Huckleberry
Warning
Huckleberry is scheduled to be retired in Spring 2022. Please consider one of our other GPU resources for deep learning applications.
Overview
Huckleberry is a high performance computing system targeted at deep learning applications. Huckleberry consists of two login nodes and Fourteen IBM Minksy S822LC compute nodes. Each of the compute nodes is equipped with:
Two IBM Power8 CPU (3.26 GHz) with 256 GB of memory
Four NVIDIA P100 GPU with 16 GB of memory each
NVLink interfaces connecting CPU and GPU memory spaces
Mellanox EDR Infiniband (100 GB/s) interconnect
CentOS 7 OS
Login
To access Huckleberry, users should login to: ssh huckleberry1.arc.vt.edu
Basic Job Submission and Monitoring
The huckleberry normal_q imposes the following limits
maximum walltime of 3 days
maximum of three nodes per user The huckleberry
large_qimposes the following limitsmaximum walltime of 1 day
maximum of four nodes per user The current configuration allows users to run jobs either through the batch scheduler or interactively. The following is a basic hello world job submission script requesting 500 GB memory and all four Pascal P100 GPU on a compute node:
#!/bin/bash

#SBATCH -J hello-world
#SBATCH -p normal_q
#SBATCH -p normal_q
#SBATCH -N 1  # this will not assign the node exclusively. See the note above for details
#SBATCH -t 10:00
#SBATCH --mem=500G
#SBATCH --gres=gpu:4
#SBATCH --account=(YOUR ALLOCATION ID)
echo hello world
NOTE: asking for -N 1 without specifying how many cores per node will default to only 1 core (equivalent to -n 1). If you would like to get the full node exclusively, you should ask for all the cores on the node using the flag -n, or, you could use the --exclusive flag.
To learn how to submit or monitor your jobs, please see the Slurm documentation.
In many cases jobs will require fewer than the four GPU available on each huckleberry compute node. GPU can be requested as a generic resource (GRES) through Slurm by requesting a specific number of processor cores and GPU. To request one processor core and one GPU in an interactive session with 8 GB of memory per processor core,
interact --nodes=1 --ntasks-per-node=8 -l walltime=0:10:00 --mem-per-cpu=8G --gres=gpu:1 -A yourallocation
Slurm will set the $CUDA_VISIBLE_DEVICES environment variable automatically based on your request. Multiple processor cores and/or GPU can be requested in the same manner. For example, to request two GPU and 10 CPU cores, one might run
interact -n10 -t 10:00 --mem-per-cpu=4G --gres=gpu:2
The Power8 CPU are viewed by Slurm as 20 processor cores.
Software
Software modules are available on huckleberry and function in the same manner as other ARC systems, e.g. the following syntax will load the module for cuda module load cuda. Additionally, IBM’s PowerAI deep learning software are installed under within the Anaconda3 module. A few brief tutorials are provided below.
Python
For users that would like to customize their Python environment, we provide online documentation for best practices to manage Python on ARC systems. For more detailed usages, please refer to part below.
Jupyter Notebooks
Jupyter notebooks are included in the anaconda python distribution installed on huckleberry. An example script to launch a job on a compute node is here:
#!/bin/bash

#SBATCH -J start-jupyter
#SBATCH -n 4
##SBATCH --exclusive
#SBATCH --gres=gpu:pascal:1
#SBATCH --mem=120G
#SBATCH -t 24:00:00
#SBATCH -p normal_q

echo "starting jupyter notebook"

#PATH=/home/mcclurej/anaconda2/bin:$PATH
export PATH=/opt/apps/anaconda2/4.4.0.1/bin:$PATH

module load cuda
source /opt/DL/caffe-ibm/bin/caffe-activate
source /opt/DL/openblas/bin/openblas-activate
source /opt/DL/tensorflow/bin/tensorflow-activate
source /opt/DL/theano/bin/theano-activate
source /opt/DL/torch/bin/torch-activate
source /opt/DL/digits/bin/digits-activate

#let ipnport=($UID-6025)%65274
#echo $ipnport >> ipnport.txt

#jupyter notebook --ip=$HOSTNAME --port=5034 --no-browser > jupyter.server
unset XDG_RUNTIME_DIR

GPUID=$(echo $CUDA_VISIBLE_DEVICES | cut -c1)
port=`expr 5030 + $GPUID`

jupyter notebook --ip=$HOSTNAME --port=$port --no-browser &>  jupyter.hostname

exit
This will start a jupyter notebook with an appropriate hostname and port so that the session can be opened in a browser on the login node. When using firefox, it is recommended to use X-forwarding and compression when connecting to huckleberry as follows
ssh -X -C huckleberry1.arc.vt.edu
Download the juypter-server script to your home directory with
Then if the script above is in the file jupyter-server.sh, you can start the notebook by submitting a batch job with
sbatch jupyter-server.sh &
The script will populate the file jupyter.hostname with the appropriate URL to interact with the remote session. This URL can be extracted from the file as follows
URL=$(grep -A2 URL jupyter.hostname | tail -1)
Then open a firefox window from the login node
firefox --no-remote -url $URL &
The jupyter notebook should open in the firefox browser, running on the compute node assigned to you job.
PowerAI
Many of the PowerAI tools depend on cuda, and your $PATH and $LD_LIBRARY_PATH variables should be set accordingly:
export PATH=/usr/local/cuda-8.0/bin:$PATH
export LD_LIBRARY_PATH=/usr/local/cuda-8.0/lib64:$LD_LIBRARY_PATH
Theano depends on pycuda, which is not included in the centrally-provided python. It can be installed locally as follows (see our python user guide for additional details):
pip install --user pycuda
DIGITS wraps several of the popular deep learning tools into an easy-to-use web interface. To open the DIGITS interface, first establish an instance of the DIGITS server by submitting a batch job that launches digits-devserver on one of the compute nodes. The following script will start the digits server on a compute node with 2 hours of walltime:
#!/bin/bash

#SBATCH -J digits-devserver
#SBATCH -N 1
#SBATCH -t 24:00:00

echo "starting digits server"

module load cuda
source /opt/DL/caffe-ibm/bin/caffe-activate
source /opt/DL/openblas/bin/openblas-activate
source /opt/DL/tensorflow/bin/tensorflow-activate
source /opt/DL/theano/bin/theano-activate
source /opt/DL/torch/bin/torch-activate
source /opt/DL/digits/bin/digits-activate

digits-devserver

exit
The job should be launched by typing
sbatch digits-devserver.sh
Type squeue to identify which compute node the job is running on. Once the server is running on the compute node, you will be able to load DIGITS from a browser that runs on the login node. To start firefox from the login node, type
firefox --no-remote &
If your job is running on compute node hu001, you should point your browser at http://hu001:5000 to open the digits interface (if your job is running on another compute node, you should enter it instead of hu001). DIGITS essentially provides a portal to control the jobs that run on the compute node. To train a basic model, a good starting point are the basic examples included in DIGITS. Input data has already been downloaded to the ARC filesystem. A local copy can be obtained by running
tar xvzf /home/TRAINING/mnist.tar.gz
Once the data has been downloaded, you can train a model by following the steps described at https://github.com/NVIDIA/DIGITS/blob/master/docs/GettingStarted.md.
NUMA
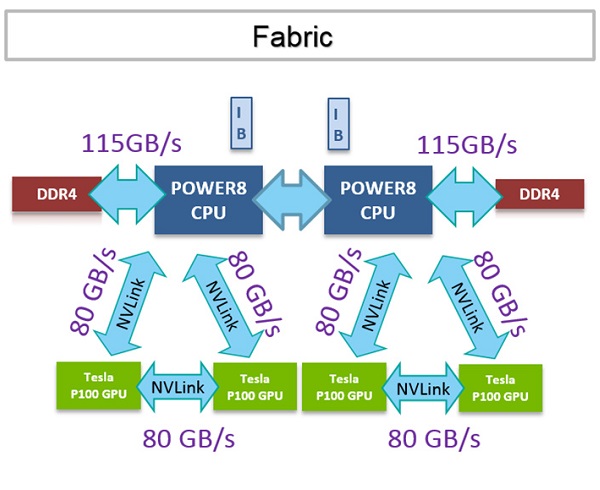
Understanding non-uniform memory access (NUMA) patterns important to get the full benefit of the S822LC compute nodes on huckleberry. The memory bandwidth associated with data movement within each compute node is summarized in the diagram below. Note that each Power8 CPU is coupled to two P100 GPU through NVLink, which supports bi-directional data transfer rates of 80 GB/s. The theoretical maximum memory bandwidth for each Power8 CPU is 115 GB/s. The theoretical maximum memory bandwidth for each NVIDIA P100 GPU is 720 GB/s.
PowerAI Installation & Usage (Updated in April 2019)
All testing(on TF, Pytorch, Keras(TF backend), Caffe) has been performed with python/3.6 on Huckleberry GPU nodes, you could see testing demonstrations and example python scripts from this shared Google Drive Folder
Part 1. PowerAI Library Usage (PREFERRED)
# step 1: request for GPU nodes
# salloc --partition=normal_q --nodes=1 --tasks-per-node=10 --gres=gpu:1 bash
# step 2: load all necessary modules
module load gcc cuda Anaconda3 jdk
# step 3: activate the virtual environment
source activate powerai16_ibm
# step 4: test with simple code examples, Google drive above
python test_pytorch.py
python test_TF_multiGPUs.py
python test_keras.py
# step 5: for new packages(take beautifulsoup4 for example)
pip install --user beautifulsoup4 # on hulogin1/hulogin2
# or pip install --user --no-deps keras
Part 2. Installation
First make sure you are in hulogin1/hulogin2
module load gcc cuda Anaconda3 jdk
java -version
conda create -n powerai36 python==3.6 # create a virtual environment
source activate powerai36 # activate virtual environment
conda config --prepend channels https://public.dhe.ibm.com/ibmdl/export/pub/software/server/ibm-ai/conda/
# if things don't work, add two channels and run commands showing below
conda config --add default_channels https://repo.anaconda.com/pkgs/main
conda config --add default_channels https://repo.anaconda.com/pkgs/r
# install ibm powerai meta-package via conda
conda install powerai
# keep type 'enter' and then enter 1 for license acceptance
export IBM_POWERAI_LICENSE_ACCEPT=yes
# you will need to update the jupyter package
conda install jupyter notebook
Please feel free to contact us if you have seen issues or have special requirements over using ML/DL/Simu/Vis packages on Huckleberry.